After exploring Indian cooking, I have started adventuring in Thai Cuisine.

I find some dishes to be quite complex, but why don’t we start with a quick stir fry using in-season asparagus?

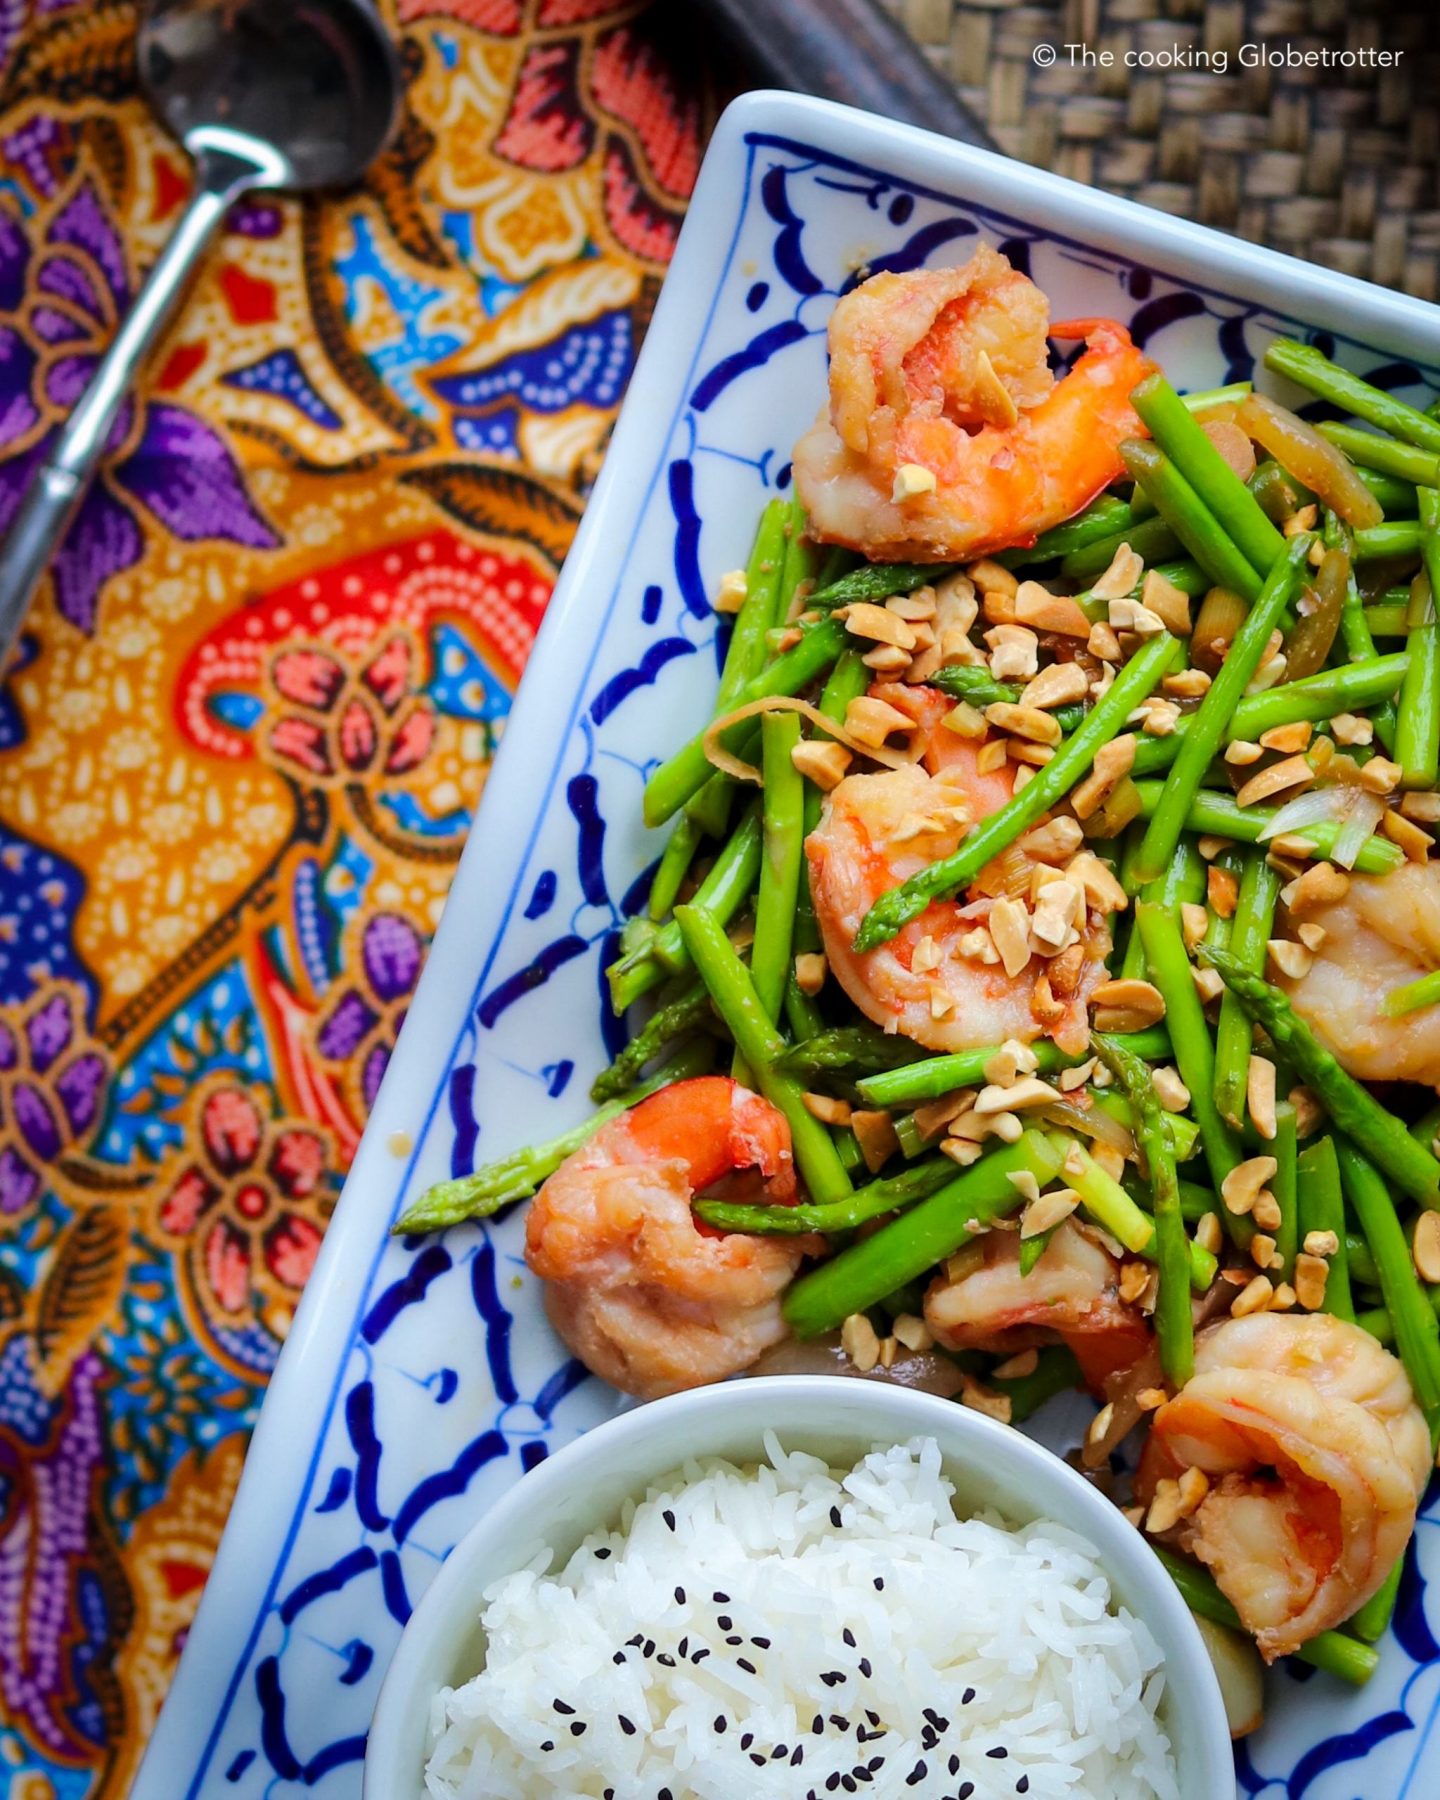
This dish, served with plain steamed basmati rice, has a wonderful Thai flavour but it’s really quick to prepare.

Did you know, that there are Thai Asparagus? They are thinner than the well-known green asparagus grown in Europe or Central America, but not as thin as the wild ones. They have a more delicate flavour that goes so well with the prawns!

Thai cooking is all about balancing sweet, spicy, salty, crunchy and smooth and this dish does it all!

Main
Thai Asparagus and Prawns Stir-fry

Hungry? Go buy the ingredients! If you are aiming for the original Thai experience, do invest in Thai products as they have a different flavour then the Chinese ones. Here is your shopping list:

Ingredients:

20 tiger prawns, peeled and deveined

1-2 tablespoons of Thai soy sauce (or light soy sauce)

2 tablespoons of coconut oil (or any other vegetable oil)

2 cloves of garlic

3 stalks of lemongrass, use the white parts, smashed with the side of the knife

1 fresh small red chilli

1 small onion, sliced

300 g of Thai asparagus (or regular green asparagus), cut into 3 cm pieces

1 tablespoon of Thai fish sauce (omit if you don’t like the fishy taste)

1 teaspoon of Thai palm sugar (or light brown sugar)

the juice of 1 lime

2 tablespoons of chopped roasted peanuts

2 tablespoons of chopped chives

Instructions:

1. Marinate the cleaned prawns in 1 tablespoon of Thai soy sauce for 10 minutes.

2. Heat 2 tbs of (coconut) oil in a wok, add the 2 chopped garlic cloves and fry for 1-2 minutes.

3. Add 3 lemongrass stalks (only the white part, smashed to release the flavours and chopped), 20 marinated prawns and some chopped fresh chili (a whole chilli for a lot of heat, only half for good heat, use a tiny piece for mild) and stir fry for 2-4 minutes until the prawns change colour.

4. Add the sliced onion and cook for another 2 minutes.

5. Now add the asparagus (300g), washed and cut in 3 cm pieces. Fry for 3 minutes or until the asparagus is cooked.

6. In a small bowl mix 1 tbsp of Thai fish sauce (use Soy sauce if you do not like fish sauce) with 1 tsp of Thai palm sugar to dissolve it. Add the juice of the lime and mix well.

7. Add the sauce into the wok and stir fry for another minute. Taste and adjust (add fish sauce if it lacks salt; palm sugar if it is too salty; lime for more tanginess or freshness).

8. Garnish with the chopped peanuts and chives.

9. Serve hot with basmati rice and a cold glass of Thai beer.

10. Enjoy!

Close Up
Thai Asparagus and Prawns Stir-fry

Do you know you can do this also vegan? Simply use firm Tofu instead of the prawns, marinate it in soy sauce and chilli flakes to give it some flavour and stir fry before to give it a nice crunch!

Thai asparagus and Tofu stir-fry

What would you choose? Prawns or Tofu? Let me know in the comments below!

Time for another quick and easy Thai dish: pineapple fried rice! I’m quite sure it does belong to the regular dishes you order at your favourite Thai. Well, follow this easy recipe and you can make your own anytime you feel like it!

I really recommend going the extra mile and presenting it in the pineapple – some here even say it tastes better that way!!

As usual, I listed the ingredients in order of appearance, so you don’t have to search up and down the list.. that makes me crazy when I’m cooking because I usually do not prep everything first.

Also for your (and mine) convenience, I will write the quantities of the ingredients as they are needed throughout the instruction, this way you don’t need to go back to the ingredients list while you are cooking! Handy, right??

Main
Home-made Pineapple Fried Rice

Ingredients:

* 1 pineapple

* 2 tbsp good quality extra virgin olive oil

* 1 garlic clove, finely chopped

* 1 shallot or small onion

* 1 egg

* 50 g peas (frozen are fine)

* 1/2 carrot, diced

* 1 tbsp of raisins (golden or regular, as you prefer)

* 1 handful of cashew nuts

* 500 g of cooked jasmine rice (approximately 2 cups, leftover rice is the best!) – I love the Jasmin Rice from Reishunger and you can order with 10% discount using the code REISLAURA10 – affiliate link

* salt

* 2 tbsp Thai soy sauce (or light soy sauce)

* 1/2 tsp turmeric powder

* 1 spring onion, chopped

* 1 handful of fresh coriander, finely chopped

* 1 lime

Instructions:

1. Cut the pineapple in half along the long side and hollow it out. Dice 130 g of flesh and set it aside.

2. Prep all the other ingredients. Thai cuisine has a long preparation but then the dish is ready in minutes, so you really need to have everything chopped, diced and measured before heating up your wok! So chop one garlic clove and one shallot. Dice 1/2 a carrot. Cook 50 g of peas. Get 1 egg, raisins, cashew nuts, cooked rice (500g), soy sauce, turmeric, and salt. Chop one spring onion and a handful of coriander. Cut a lime in quarters.

3. Heat up your Wok (or a big pan) with 2 tbsp of olive oil (good quality, please!) and fry the garlic and shallot.

4. Crack your egg in the wok and cook it stirring constantly.

5. Throw in the peas (50g), carrot (1/2, diced), raisins (1tbsp), cashews (1 handful), diced pineapple, and rice (500g cooked) and fry it all on high flame and stirring all the time.

6. Season with salt, Thai soy sauce (2 tbsp) and turmeric powder (1/2 tsp).

7. Place your fried rice in the halved pineapple.

8. Finish sprinkling the spring onion and coriander on the top and placing the limes on the side.

9. Enjoy!

Close
Thai Fried Rice

Best way to enjoy this dish is to pair it with a nice cold beer and my Thai green curry with chicken, you can find the recipe on the blog or just by clicking on the name here above.

If you are up for a Thai feast, search the other Thai dishes I shared here!

Pin Pinterest Thai cooking Pineapple fried rice culinary journey of the cooking Globetrotter Laura Thailand favourite Thai dish fried rice with peas, cashew nuts, carrots, pineapple and turmeric
Save this Thai pineapple fried rice on Pinterest

Bread dough, yeast dough, brioche dough… all kind of scary to me… They might be difficult to make, raise, bake. BUT it’s just a matter of finding the right recipe. And my dear friend and blogger Belma is a pro when it comes to baking! So here they are, Belma’s pull-apart muffins with chocolate chips.

Belma shares her love for all things sweet with us on her Blog with new recipes almost every day. As a mother of three, she balances sweet recipes with healthier choices. These muffins, for example, contain very little sugar and being homemade they are already a better choice for your little one’s lunchbox!

I was almost shocked by how simple this dough was done. My kids loved the muffins and not also they had the pleasure to enjoy them! Like Belma, I filled them with chocolate chips, because, who doesn’t love them? But you can definitely use also other ingredients, like jam, spreads, nuts, cinnamon, spices and so on…

pull-apart muffins
Chocolate chips muffins

Yes, I mean, how gorgeous do these little things look?! And seriously, making them was a breeze, even for someone scared of brioche dough like me!

Pull apart Muffins with chocolate chips recipe

So, what do you think, are you going to give it a try? Great! (I am pretty sure your answer is yes!). Then let’s move on to the recipe:

Ingredients:

100 ml of milk

42 g of fresh yeast (or 21 g of dry yeast)

20 g of sugar (use more if you want them sweeter)

400 g of flour (Belma uses whole-wheat, I used regular unbleached flour)

2 eggs (room temperature)

1 pinch of salt

1 tsp of vanilla extract

50 g of soft butter

chocolate chips to fill the layers, or whatever you like (jam, nuts, spreads, dry fruits, spices..)

Belma's muffins
Pull-apart muffins

Instructions:

  1. Warm up the milk (100ml), you want it to be warm but not boiling or tongue-burning hot.
  2. Mix in the yeast (42g fresh/21g dry) and the sugar (20g or more) and let them dissolve, by mixing them with a fork.
  3. You may use a machine to knead the dough (or simply use your muscles!): put everything in a bowl (except the chocolate chips of course) and go!
  4. You want to keep kneading until the dough doesn’t stick to your hands anymore. Then you can form a ball and place it in another bowl dusted with flour. Cover with a kitchen towel and let it rest for one hour. No peaking!
  5. Now, this is the step that I was worried about, but believe me, it’s easy: dust your kitchen counter with a little bit of flour (really, just a little), place the dough on it and roll it out with your rolling pin (put some flour on it as well). Do not knead the dough. Simply roll it out. Don’t worry about the form, we will cut it anyway.
  6. Cut the dough in squares. They should be a little bit bigger than your muffin tins*.
  7. Spray your muffin forms with non-stick spray or brush them with melted butter
  8. Place one square in one of the forms, top with some chocolate chips (I had 4) or whatever you choose, and repeat. 4 to 5 layers for each muffin should do.
  9. Let your muffins rest another 30 minutes under a kitchen towel.
  10. Preheat the oven at 180 degrees Celsius (or 160 if using air).
  11. Bake for 15-20 minutes or until golden brown.
  12. Enjoy!
Close Belma's pull-apart muffins with chocolate chips, the perfect snack for hungry children and parents
Low sugar muffins

As you can see, someone here was very eager to get her lovely little hands on one of those yummy muffins! And yes, I managed to save a couple for the lunch boxes (simply store in aluminum boxes or glass containers) but I had to hide them!

Thanks, Belma so much for this wonderful recipe and for letting me share it in English with my readers! If you need more inspiration, check out her blog!!

Don’t have enough time to let the dough rise? Then have a look at my muffins and cupcakes recipes! You will find sugar free muffins, Nutella muffins and much more!

Pinterest Pin Belma's pull-apart muffins with chocolate chips, the perfect snack for hungry children and parents
Pin it for later

* affiliate link: I recommend only products I love and use myself. If you purchase them using the link, I will get a small commission. Thank you for supporting the blog.

This easy and quick asparagus quiche is perfect for your Easter Brunch and also when you have to whip up something fancy for your guests or hungry family members!

Don’t have asparagus? No worries! Just switch to any veggies you have in your fridge!

I saw this beautiful and quick asparagus Quiche on the Instagram account of Frances from Carry on cooking  – and I immediately started looking for asparagus to make it myself. I adapted the recipe a little because I was in a rush and it turned out delicious!

Asparagus Quiche with Ricotta quick and easy meal for Easter brunch and hungry family and friends or guests
Asparagus Quiche with Ricotta

Ingredients:

* one sheet of puff pastry (I used wholemeal)

* 250 g of ricotta cheese

* one egg

* salt and pepper

* (Thai) asparagus or veggies of your choice

* 80 g of feta cheese

If you don’t have asparagus you can use other vegetables, like zucchini, pepper, tomatoes, … just make sure you cut or slice them nicely so that they will cook in the oven.

healthy and light quiche
Healthy and light quiche

Instructions:

1. Preheat the oven at 170 degrees.

2. Roll out your puff pastry sheet on your baking tray lined with baking paper.

3. In a bowl mix the ricotta cheese with the egg, salt and pepper.

4. Spread the ricotta mix on the puff pastry.

5. Place your asparagus (washed and cleaned of course) or other veggies on the cream.

6. Sprinkle with the feta cheese.

7. Bake for approximately 30 minutes.

8. Enjoy with a nice green salad!

Looking for other quiches? Try out my spinach and ricotta pie with a homemade delicious crust!


Pinterest Asparagus Quiche with Ricotta quick and easy meal for Easter brunch and hungry family and friends or guests
Save me on Pinterest

Getting ready for Easter with an Italian recipe for Pastiera di Riso

Are you already in the Easter mood? Decorating your home with bunnies, eggs, and flowers? We are all going to be stuck at home this year, which gives us time to make a slightly more elaborate cake than usual. Like my own version of an Italian classic Easter recipe: pastiera di riso, an italian rice pudding cake.

The original recipe calls for grano cotto (cooked wheat), a high number of eggs, a huge quantity of sugar, a good amount of ricotta cheese, candied orange zest and so on plenty of time.

My version is more of an easy and quick fix, using ingredients that are widely available and a preparation that won’t have you go crazy. My pastiera di riso, alias rice pudding pastry cake, is perfect for your Easter Brunch and many other occasions. Serve at room temperature or cold from the fridge and let me know how you enjoyed it in the comments below!


Pastiera di riso rice pudding pastry for Easter Napoli Italian from Italy original easy version recipe with rice pudding for the whole family and your Easter Brunch or Lunch perfect cake
Italian classic made easy

Ingredients for Italian Rice Pudding Cake:

  • 200g rice (Arborio, for rice pudding) *
  • 500ml milk of your choice
  • 1 tonka bean (substitute with vanilla or cinnamon if you prefer)
  • 500g flour
  • 5 eggs
  • 150g sugar
  • 50g palm sugar (or brown sugar)
  • 200g butter, cold
  • 400g ricotta
  • 100ml cream
  • 1tsp almond extract (or lemon zest or any other flavouring of your choice)
  • 1 pinch of grounded cinnamon
  • icing sugar to decorate

Pastiera di riso rice pudding pastry for Easter Napoli Italian from Italy original easy version recipe with rice pudding for the whole family and your Easter Brunch or Lunch perfect cake
Pastiera di riso

Instructions:


  1. Start by cooking the rice (200g): put it in a pan with the milk (500ml) and the tonka bean and let it come to a boil. Turn the heat down and let it simmer until it has absorbed almost all the milk, but is still creamy. Remember to mix it frequently and to keep an eye on it. Let it cool down completely (you can spread it out on a plate to make it quicker).
  2. Prepare the dough by kneading together (with a machine if you like) the flour (500g), eggs (3), sugars (100g+50) an butter (200g in cubes).
  3. Line a quiche baking form (or a regular round cake tin) with baking paper and place the dough in it. You can roll it out with a rolling pin, or simply use your hands to flatten out half of the dough on the bottom of the tin, 1/4 of it on the sides. Keep 1/4 of the dough aside (in the fridge) for the topping.
  4. Preheat the oven at 170C (fan modus).
  5. In a bowl whisk the ricotta (400g), cream (100g), 1 tsp of almond extract, sugar (50g), 1 egg and 1 yolk until well blended.
  6. Add the cooled down milk rice (remove the tonka bean) and amalgamate with a spoon or spatula.
  7. Pour the filling into the cake tin filled with pastry.
  8. Roll out the remaining dough and cut stripes of approximately 2cm. Place them on top of the filling in a criss-cross pattern.
  9. Bake for 45-50 minutes, until dry in the middle (try with a wooden stick).
  10. Once it has cooled down, take it out carefully from the tin and sprinkle with icing sugar.
  11. Serve room temperature or chilled
  12. Store in the fridge if you have left overs.
  13. Enjoy!

Italian Rice Pudding Pastry

What are you going to serve on your Easter table? I would love to know, just comment below!

If you are looking for something savory, my herby ricotta bread is the perfect low carb treat for your brunch!


One of my favorite Indian dishes is Saag Paneer: a vegetarian creamy spinach curry with crispy cheese cubes. A delicious and healthy meal, that is so easy to make at home!

Perfect in the winter months as we can use seasonal products and make a warming and comforting meal, packed with vitamins.

If paneer is not available to you, you can use potatoes, cauliflower, chickpeas, tofu or any other vegetable. Or make your own paneer! It only takes 2 liters of milk, vinegar, and a cheesecloth!

Don’t get intimidated by the long list of ingredients needed to cook saag paneer, most of them are spices and herbs!

Main Vegetarian curry Indian saag paneer palak vegeterian vegan curry spinach indian India recipe food easy cooking the cooking globetrotter culinary journey
Saag Paneer – spinach curry

Ingredients:

  • 4 Tbsp Coconut oil
  • 350 g Paneer, cubed (or homemade with 2 liters of milk)
  • 1 tsp cumin seeds
  • 1 onion, finely chopped
  • 1 Tbsp ginger, finely chopped
  • 2 garlic cloves, finely chopped
  • 1 chili (or less, go with your spicy tolerance), finely chopped
  • 1 tsp coriander powder
  • 1/4 tsp chili powder
  • 1/4 tsp turmeric powder
  • 2 tsp salt
  • 150 ml tomatoes sauce
  • 2 Tbsp fresh coriander, chopped
  • 2 Tbsp fresh chives, chopped
  • 1 Tbsp Kasuri Methi (fenugreek) – optional
  • 1 Tbsp Dill, finely chopped
  • 450 g chopped frozen spinach, defrosted
  • 3/4 tsp garam masala powder
  • 150 ml cream
creamy spinach curry Indian saag paneer palak vegeterian vegan curry spinach indian India recipe food easy cooking the cooking globetrotter culinary journey
Spinach curry with cheese

Instructions:

  1. In a small pan heat up 2 Tbsp of coconut oil (or any other oil of your choice) and fry the paneer until crispy on all sides. Do so in batches and put the fried ones on some kitchen paper to dry a little.
  2. Put 2 Tbsp of coconut oil (or other) in a pot and heat it up, add the cumin seeds (1tsp) and let them release their aroma.
  3. Now pour in the chopped onion, ginger (1Tbsp), garlic (2) and chilli (a whole one for a lot of heat, half for good heat, omit for mild flavour) and let everything cook, add a little water if necessary.
  4. Time to use the spices: add coriander powder (1tsp), chilli powder (1/4tsp), turmeric (1/4tsp) and salt (2tsp) and mix well together.
  5. Pour in the tomato sauce (150ml) and let it all come together.
  6. You can now add all the greens: coriander (2Tbsp), chives (2Tbsp), Kasuri Methi (1Tbsp), Dill, (1 Tbsp) and spinach (450g), mix well and cook for about 10 minutes.
  7. At this point you can add the fried paneer, mixing carefully as not to break it.
  8. Finish adding 3/4 tsp of garam masala powder and 150 ml of cream.
  9. Enjoy with rice and/or naan.
Pin Pinterest Indian saag paneer palak vegeterian vegan curry spinach indian India recipe food easy cooking the cooking globetrotter culinary journey
Spinach Curry easy recipe

You can round up this meal with some Butter Chicken! Check out all my Indian recipes under Recipes/by country/India

Thanks to Payal from Commune Kitchen for introducing me to the Indian Cuisine and the amazing foodie tours in Little India in Singapore!

Stay tuned! More Indian recipes will follow!


One of the most loved recipes on my blog is Butter Chicken – an Indian Classic dish perfect for the whole family. I am posting it again as our culinary journey has taken us to India.

Butter chicken is probably the most common and well known Indian dish. Did you know that it is quite easy to make at home? This way you will be able to adjust how spicy and creamy it is going to be and you will make everyone happy in the family!

You will need to marinate the chicken first (overnight or at least a couple of hours) and then prepare the sauce separately.


Close butter chicken Indian curry creamy family dish naan rice favourite Indian India
The most loved Indian Curry

Ingredients Marinade:

600 g of chicken breast (the original recipe calls for thighs, you go with whatever you like!)

4 tablespoons of plain yogurt

2 cm of ginger, finely chopped

2 garlic cloves, finely chopped

1 fresh chili, finely chopped

1/2 teaspoon of turmeric powder

1 teaspoon of salt

1/2 teaspoon of chili powder

3/4 teaspoon of garam masala powder

2 tablespoons of coconut or olive oil

Instructions Marinade:

  1. Clean and chop your chicken in cubes (approximately 2×2 cm).
  2. Place it in a bowl with 4 tablespoons of natural yogurt, 2 cm of peeled and finely chopped ginger, 2 garlic cloves finely chopped (you can chop the ginger and the garlic together), the chili (1 whole for spicy, 1/2 for mild, omit if you don’t want it hot) finely chopped, 1/2 teaspoon of turmeric powder, 1 teaspoon of salt, 1/2 teaspoon of chili powder and 3/4 teaspoon of garam masala powder.
  3. 3. Mix it all well, cover it and let it marinate in the fridge overnight or for 2-3 hours (the longer the better).
  4. Time to cook the chicken: heat 2 tablespoons of coconut oil (or extra virgin olive oil or ghee) in a big non-sticking pan, cook the chicken for about 5-6 minutes, turning it every couple of minutes.
  5. Set aside and move on to the sauce.

Close butter chicken Indian curry creamy family dish naan rice favourite Indian India
The most loved Indian Curry

Ingredients for the sauce:

3 tablespoons of coconut oil (or olive oil or ghee)

1,5 teaspoons of cumin seeds

2 onions, chopped

2 cm of ginger, chopped

2 cloves of garlic, chopped

1 fresh chili, chopped

50 g of cashews (natural, not salted), broken

400 g of pureed tomatoes (one can)

1,5 teaspoons of coriander powder

1/4 teaspoon of chili powder

1/2 teaspoon of turmeric

1 teaspoon of salt

water

3/4 teaspoon of garam masala

3 cardamoms, pounded

3 tablespoons of Kasuri methi (dried fenugreek leaves)

150 ml of cream

Instructions:

  1. Take a big saucepan (one, where you can use your hand blender in it), heat 3 tablespoons of coconut oil (or olive oil or ghee), add 1,5 teaspoons of cumin seeds once the oil is hot and let them splutter for a minute. Add 2 chopped onions, ginger (2 cm peeled and chopped), 2 garlic cloves chopped and the chopped chili (whole for good heat, 1/2 for mild and omit for not spicy). Stir well and fry until the onions start to caramelize, add a little bit of water if necessary (before everything burns!).
  2. Brake the cashews roughly in a morsel or with a meat tenderizer (in a ziplock bag) and throw them in the saucepan, let them fry for a couple of minutes then add one can (400 ml) of pureed tomatoes. Turn the heat off and blend everything carefully with your hand blender (you can also use a standing blender, of course, here you may need to add some water). Add water if it is too thick and not easy to mix.
  3. Turn the heat under the saucepan back on and add 1,5 teaspoons of coriander powder, 1/4 teaspoon of chili powder, 1/2 teaspoon of turmeric and one teaspoon of salt.
  4. Time to marry the chicken and the sauce! So add the cooked chicken with all its juices to the sauce and cook for 8-10 minutes at low-medium heat (cover it if it splutters). Add one glass/cup of water then (or earlier if you notice that it is too thick) and bring to boil. Reduce heat, cover and cook for another 10 minutes.
  5. Almost done, we just need to add the finishing touches: add 3/4 teaspoon of garam masala powder and 3 pounded (or smashed) cardamoms and stir well. Add 150 ml of cream (more or less, depends on how creamy you want it to be!), mix well. Sprinkle with 3 tablespoons of Kasuri methi (dried fenugreek leaves or coriander or parsley if you can not find them) and serve hot with steamed rice and/or naan.
  6. Enjoy!

butter chicken Indian curry creamy family dish naan rice favourite Indian India
Save me for later

Thanks to Payal Thakurani, who introduced me to the Indian kitchen and keeps inspiring me with her recipes on her cookbook Curries for the Soul.

Check out all of my Indian recipes here on the blog, from curries to sweets, you will be able to make your own Indian feast!

Our culinary journey through India just started! There are more recipes coming up! Check also my Instagram Account @thecookingglobetrotter where you will find additional easy and quick recipes!


We are starting a new culinary journey! This time we are going to explore the Indian cuisine. The first course is a delicious and simple Indian Tomato and Coconut soup with Chapati.

There is something incredibly fascinating about the Indian kitchen: all those spices, the colors, flavors, everything is so bold, intense and delicious.

I had several mentors along the way and was able to understand how to use the spices and recreate Indian flavors from scratch. It is my favorite cuisine and that’s why you can find many recipes here on my blog!

Intro indian tomato tomatoes coconut milk soup vegan india spices warming easy cooking culinary journey recipe
Ingredients for Indian Tomato Soup

I was looking for a new soup and came across this recipe on the cookbook “Red Dot Melting Pot” (written by many of my dear friends and culinary sisters, the ladies of the International Cooking Club Singapore – ICCS). Thanks to Neha Srivastava Saxena for passing down her family recipe and sharing it with us! I made some minor adjustments to meet our taste.

I served the Indian Tomato and Coconut soup with homemade Chapati, a flatbread made of Indian wholewheat flour (called Atta) and water, rolled out thin and cooked quickly on a cast iron pan and finished directly on the burner. This makes it puff up. The piping hot chapati is then brushed with melted butter, ghee or olive oil for more flavor. Thanks, Brinda for showing and teaching us how to make this lovely bread!

The idea to pair Chapati with the soup was mine. Traditionally Chapati is eaten with stir-fried veggies, lentils, and curries. Soups are common in the northern part of India where they might substitute salads as a side dish and are generally served with bread rolls, thick bread slices or breadsticks, accompanied by (garlic-)butter.

Ingredients:

  • 1 Kg well-ripened tomatoes on the vine
  • 2 tbsp extra virgin olive oil
  • 1/2 tsp cumin seeds
  • 1/2 tsp black mustard seeds
  • 1 tbsp ginger, grated
  • 2 kaffir lime leaves (or the zest of 1/2 a lime)
  • 250 ml of coconut milk
  • salt & pepper to taste
  • fresh coriander and black sesame seeds to decorate

Instructions:

  1. In a large pot boil some water (enough to cover the tomatoes).
  2. In the meantime wash them and with a sharp knife cut a cross in the skin of the bottom of each tomato.
  3. Dip them in the boiling water and cook them 1-2 minutes, take them out and remove the skin (careful, hot!).
  4. Puree the flesh in a blender.
  5. Strain through a sieve. If you can’t find good tomatoes or want to take a shortcut, you can use 1 liter of plain tomato sauce instead of following instructions 1 to 5.
  6. Heat up the olive oil (2 tbsp), add the cumin seeds (1/2 tsp), mustard seeds (1/2 tsp) and ginger (1tbsp) and let them sizzle.
  7. Pour in your pureed and strained tomatoes or the tomato juice.
  8. When it starts boiling, add the coconut milk (250ml) and reduce the heat.
  9. The soup is ready when it starts boiling again.
  10. Finish with salt, pepper and the kefir lime leaves (or lime zest).
  11. Pour in individual bowls, sprinkle with black sesame seeds and fresh coriander leaves.
  12. Enjoy with Chapati, Naan or rice.
Main indian tomato tomatoes coconut milk soup vegan india spices warming easy cooking culinary journey recipe
Soup and Chapati

Feeling hungry? How about complementing the soup with homemade Naan bread or a lovely butter chicken? All recipes on the blog in the India section!

What is your favorite Indian dish? I would love to know! Write it in the comments below!

Pinterest indian tomato tomatoes coconut milk soup vegan india spices warming easy cooking culinary journey recipe
Indian Tomato Soup Pin
Laura Matteucci

Ciao!

Ich bin Laura, in Italien geboren, jetzt in Österreich zuhause. Zwischendurch habe ich in ChinaSingapur und den USA gelebt.

Wir reisen so oft (und weit) wie möglich. Und wenn wir nicht gerade unterwegs sind, dann kochen wir um die Welt mit saisonalen und regionalen Zutaten.

Hier findest du unsere Lieblings Rezepte aus der ganzen Welt!
Viel Spaß beim Stöbern! 

Deine Laura

Mehr über mich erfährst du hier

Castagnole are Italian Carnival Fritters: Sweet dough fried balls covered in icing sugar or sticky honey and colorful sprinkle, to me Castagnole are the image of Carnival. Do you celebrate Carnival? How? Any particular dishes that you relate to Carnival?

Some dishes instantly connect you to a certain place, memory or person. I remember my grandmother, Nonna Vanna making this little sweet balls, which she called Strufoli (that’s their name in Umbria) and covering them with loads of honey (she had a sweet tooth!) and colorful sprinkles for Carnival.

It’s interesting to see that this old Italian Carnival recipe, already found in cookbooks from the 17th century, has a lot in common with other typical Carnival food, like the German Krapfen, for example, also a sweet fried dough filled with apricot jam or vanilla custard.

Main Italian Castagnole, Frappe, Strufoli fritters carnival fried dough sweets Italy recipe
Fried sweet dough for Italian Carnival

The nature of those dishes has to do with the meaning of Carnival, a feast of abundance. Everything was allowed until Mardi Gras (literally translated “the Fat Tuesday”), 40 days before Easter a time known as a dark period of fasting and penitence. So enjoy those little babies in moderation, if you are not planning to fast afterwards! But try them out, they are delicious and the recipe is, as always, quick and simple.

Ingredients:

  • 500 g flour
  • a pinch of salt
  • 180 g of sugar
  • 4 eggs
  • 100 g of melted butter
  • 100 ml of milk
  • 16 g of baking powder
  • oil for frying
  • powder sugar or honey and sprinkles

Instructions:

  1. Mix the flour (500g), one pinch of salt and sugar (180g).
  2. Add the eggs (4), melted butter (100g), milk (100ml) and baking powder (16g) and mix well together. You can use a spoon or a mixer or a kitchen machine.
  3. Heat up frying oil in a deep pot, enough to deep fry the balls.
  4. Using two spoons, form some balls (half a tablespoon big) and drop them into the oil. They do not need to be perfect, just try to make them roundish with the help of the spoons.
  5. Fry 4 to 6 at a time, they will turn golden brown quickly, turn them around and then take them out and place them on kitchen paper to absorb the extra oil.
  6. Once you are finished frying and the balls have cooled down completely, sprinkle with powder sugar or cover with melted honey and colorful sprinkles.
  7. Enjoy!
Main Castagnole, Frappe, Strufoli fritters carnival fried dough sweets
Castagnole, classic Italian sweets for Carnival

This is the last recipe of our Italian culinary journey! We started in Genova with a Ricotta and Spinach Quiche, moved to Tuscany to savor some crunchy Cantucci biscotti, had my son’s favorite dessert Tiramisù.

I hope you enjoyed the recipes and had a lovely time in Italy!

Starting from next week, we are going to explore my favorite cuisine: Indian!! Join me and sign up for my newsletter! I will send you a notification when a new recipe is published.

Italian Castagnole, Frappe, Strufoli fritters carnival fried dough sweets Italy recipe simple easy
Save the recipe on Pinterest

Tiramisu is probably the most popular Italian dessert, so of course, I am sharing with you my lighter version of this coffee and mascarpone deliciousness during the Italian weeks on The cooking Globetrotter!

My son helped me to prepare it. It’s my friend Michela’s version, I have been following this super easy recipe for so many years that it feels mine too.

The recipe for this Italian dessert only requires a few ingredients and very little sugar. I use Pavesini, thin crispy and light biscuits instead of sponge cake or Savoiardi biscuits because we love the cream and these biscuits do not overpower it. I have found them even in Singapore, so wherever you are, if you are looking for them, just let me know and I’ll help you find them!

pinterest recipe tiramisu Italian italy dessert coffee mascarpone
Tiramisu Recipe

Tiramisu

  1. 1
  2. 2
  3. 3
  4. 4
  5. 5

My Tiramisu’ is a lighter and creamy version of an Italian classic dessert. The recipe is easy, simple and done in minutes. Be aware: it is addictive!

simple

Ingredients

20 servings
1 Package of Pavesini Biscuits, Savoiardi if you can’t find them
 1 cup Coffee (Espresso)
 3 eggs
 3 tbsp Sugar
 500 g Mascarpone cheese
 1 pinch salt
 3 tbsp Cocoa powder

Steps of preparation

  1. Make 1 cup of coffee, espresso would be the best choice and pour it in a bowl, big enough to dip the biscuits lengthwise.
  2. Dip the biscuits in the coffee quickly with the long side and with the other and place them at the bottom and on the edges of your chosen form.
  3. Separate the eggs, place 2 whites in one bowl and 3 yolks in another with 3 tbsp of sugar.
  4. Whisk the egg whites with a pinch of salt until firm.
  5. Whisk also the yolks until they change colour and are creamy.
  6. Add the Mascarpone to the yolks and sugar cream, one or two spoons at once and amalgamate well before adding more.
  7. Then add the firm egg whites, mixing carefully with a spatula as to not lose the air.
  8. Pour half of the cream on the biscuits and spread it out evenly.
  9. Make another layer of coffee dipped biscuits. My son did an amazing job here!
  10. Finish with the leftover mascarpone cream.
  11. Cover with plastic film and store in the fridge.
  12. Before serving drizzle cocoa powder on the surface. Use a sieve to make it nice and fine.
  13. Dig in and enjoy!

How do you like the recipe?

  1. 1
  2. 2
  3. 3
  4. 4
  5. 5

You tried this recipe?

Then link @thecookingglobetrotter on Instagram or use the hashtag #thecookingglobetrotter.

I can promise you, that this Tiramisu’ is going to make it in your most-loved recipes collection! I remember my friends and family literally falling in love with it and asking for it constantly.

Let me share a funny story about my tiramisu’: I once made a big one for a friend’s party and stored it in the fridge. As I went to get it, I noticed that someone had stolen with a teaspoon the whole border of the dessert! We easily found out the thief and since then, every time I make a Tiramisu’, I will also prepare an extra portion for him!

You can also have fun trying out some variations:

  • Christmas Tiramisu’: whisk 3 egg whites instead of two. And add 125g of chestnut cream (Maron Glace cream) to the mascarpone and egg yolks cream. You will have a rich and sophisticated flavor.
  • Frozen Tiramisu’: for hot and humid Singapore I made a Coffee Parfait with Mascarpone Cream. You can find the delicious recipe here on the Blog.
  • Kids Tiramisu: use caffeine-free Coffee or dip the biscuits in juice, milk or cocoa milk.
  • Egg-less Tiramisu: use 250 ml of whipped cream instead of the eggs and mix with sugar and mascarpone.
Make coffee and let it cool down. Pour 100 ml in a small bowl. Line up a rectangular form with foil. Dip the cookies in the coffee and make one layer on the bottom of the tin, brake them up as needed for them to fit the space nicely. 2 Prepare a bain-marie: take a small pan and fill it 1/3 with water, heat it up. Take a bowl and put it on top. Place the 4 egg yolks (keep two whites for later), sugar and 50ml of coffee in it and whip constantly while cooking (not too hot!) until creamy and it changes to a lighter colour. 3 Once the colour has changed, take it out of the heat and put the bowl in another bowl filled with ice water to cool the cream quickly, keep whisking. Add the mascarpone a little at a time and mix it in (you can take the bowl out of the water to do so). 4 Beat two egg whites until stiff and then add them to the cream, mixing with a spatula from the bottom to the top. 5 Whip also the heavy cream and add to the mascarpone cream mixing carefully. 6 Pour 1/3 of the cream on top of the prepared biscuits. Top with a layer of coffee-dipped biscuits. Pour another 1/3 of cream and top again with biscuits. Repeat once again. 7 Cover with foil and let set in the freezer for at least 4 hours. Turn it upside down on your serving plate, take away the foil and sprinkle with cocoa powder before serving. Enjoy with a cup of good coffee!
Frozen Tiramisu

I am curious, which one are you going to make? Let me know in the comments below or write to me here, on Instagram or Facebook!

You can print out the recipe above or save it on Pinterest!

Next week we are still going to be in Italy and I will share with you another classic dish from my home country!

Christmas means for us Vanillekipferl: those buttery and nutty Christmas cookies are our favorites and we have to do them often as they all disappear too quickly!

We love our Kipferl, literally “little horns” in German, with lots of nuts. You can use all kinds of nuts, we prefer almonds (whole, with skin).

There are many different recipes, as this is a very traditional Christmas Cookie in Austria and basically every family has its own recipe.

Mine is inspired by a traditional and quite old cooking book from Styria, the region we live in, called St. Martiner Kochbuch” *. I adapted the recipe slightly and am sharing it here with you.

Main Vanille Kipferl Austrian Christmas cookies
Vanille Kipferl – the best Christmas cookies

Ingredients:

  • 280g flour
  • 210g of cold butter, cut in cubes
  • 70g of sugar
  • 100g of finely chopped almonds (or hazelnuts)
  • a teaspoon of vanilla extract
  • 1 egg
  • icing sugar & vanilla sugar, mixed

Instructions:

  1. Mix together 280g of plain flour, 210g of butter cut in pieces, 70g of sugar, 100g of good quality finely grated almonds, a teaspoon of vanilla extract and one egg.
  2. Let it rest in the fridge for 30-45 minutes.
  3. Heat the oven at 170 degrees.
  4. Take a piece of dough and roll it with your palms to form a cone with a diameter of 1 or 2 cm. Take a piece (2cm) and roll it with your fingers, then curve it and make it thinner on the edges.
  5. Place on baking paper and bake for 10 minutes.
  6. In a bowl or plate put some icing sugar and drop the warm biscuits in (3-4 at a time), move them around gently with a spoon to let the sugar attach to the warm surface.
  7. Let them cool completely. Enjoy!
Close Vanille Kipferl Christmas cookies from Austria
Vanille Kipferl – the best Christmas cookies

Looking for something more fruity? Then check out my Coconut Macaroons!


Intro Zoner Photo Studio X lemon poppy seed cake
Working with Zoner Photo Studio X


Recipe for lemon poppy seeds cake

Lemon poppy seeds cake

  1. 1
  2. 2
  3. 3
  4. 4
  5. 5

The best easy recipe for fluffy and delicious lemon poppy seeds cake is finally here! Increase the flavour with essential oils, check it out here.

simple
  • Prep time:
    10 minutes
  • Baking time:
    35 minutes
  • Total time:
    45 minutes

Ingredients

20 servings
225 gbutter, room temperature
150 g sugar
20 g poppy seeds
2 eggs
210 g flour
1 pinch salt
3 g baking powder
120 ml milk
2 drops Lemon Essential Oil – only use pure and certified oils, like doTERRA
3 tbsp lemon juice
2 tbsp confectioner’s sugar

Utensils

  • Baking Spray
  • electric whisk

Steps of preparation

  1. Preheat the oven at 180C. Spray your baking tin with baking spray or use melted butter to cover the borders.
  2. In a large bowl, beat the sugar and the soft butter with a whisk at medium speed for 5 minutes. It should become fluffy and creamy.
  3. Add the poppy seeds and combine them.
  4. Add the eggs and beat well.
  5. Now add the flour, baking powder, and salt a little at a time, alternating with the milk, 2 tablespoons of lemon juice and 2 drops of lemon essential oil (if you do not have one, add 1 tsp of lemon zest). Beat until just combined, do not overbeat.
  6. Pour the batter in the oiled baking form and bake for 30 minutes or until golden brown. Let it cool down 10 minutes before releasing the cake from the form.
  7. Once it has cooled down completely on a wire rack, you can add the lemon glaze. To make it mix one tablespoon of lemon juice with about 3 tablespoons of confectioner’s sugar. Add more sugar if it’s too runny. Pour over the cake and let the glaze flow down the sides.
  8. Enjoy!

Notes

If you liked the recipe and want to help me increase my reach, click on the stars below.

How do you like the recipe?

  1. 1
  2. 2
  3. 3
  4. 4
  5. 5

You tried this recipe?

Then link @thecookingglobetrotter on Instagram or use the hashtag #thecookingglobetrotter.


Pin lemon poppy seeds cake essential oils glaze Guglhupf recipe zoner
Pin the lemon poppy seeds cake