A delicious snack from Indonesia

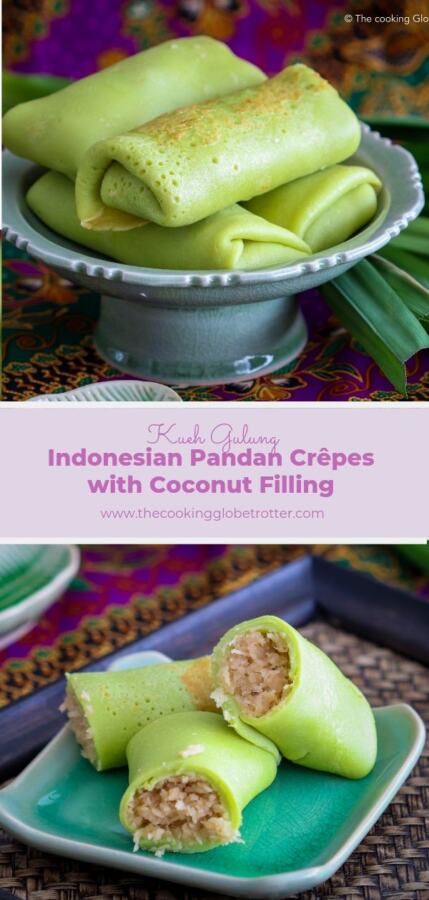
Have you ever been to Indonesia or Malaysia? This is where those delicious Kue (which means snack) Pandan pancakes with Coconut Filling come from.

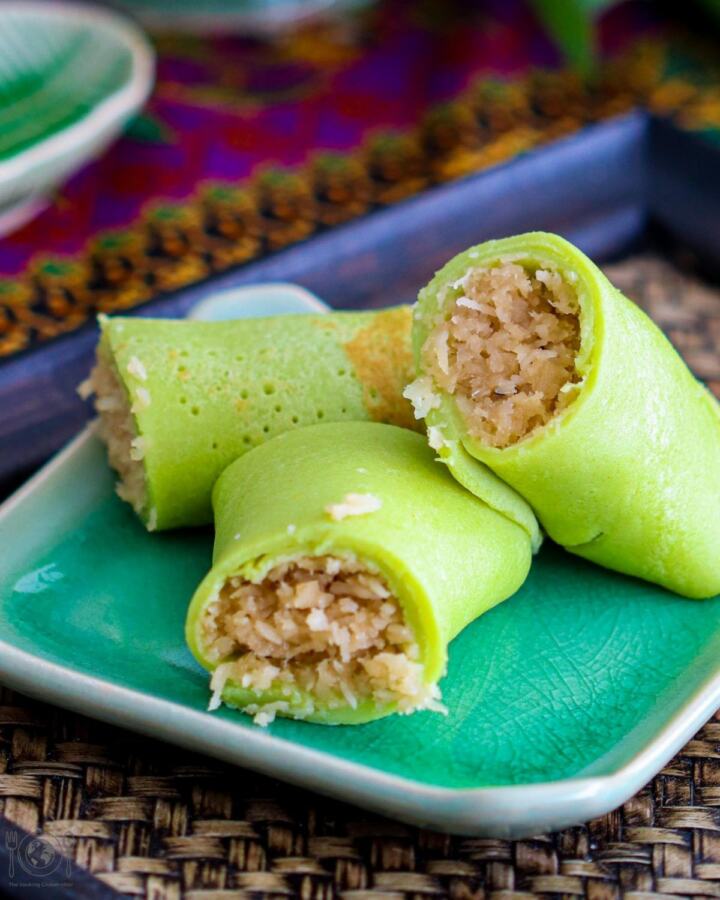
The Pandan Juice is responsible for the beautiful green colour and adds a nice flavour, described as slightly nutty and aromatic, a bit like vanilla. Pandan is a tropical plant that grows and is cultivated in South East Asia. The narrow and long green leaves are widely used for cooking and flavouring, you can see them in the background of the picture.

In Singapore it is very easy to find fresh Pandan leaves. But if you are not so lucky and still want to discover the flavour, you can buy Pandan Juice or Extract. Sometimes you can even find powder. Use whatever is available to you to add aroma to the thin pancakes. Ask your asian shop.

Dadar Gulung
Indonesian Pancake

Recipe for Dadar Gulung

Dadar Gulung – Indonesian Pandan pancakes with coconut filling

  1. 1
  2. 2
  3. 3
  4. 4
  5. 5

Dadar Gulung is a traditional Indonesian and Malaysian dessert: rolled pancakes, flavoured with pandan juice and stuffed with coconut caramelized in palm sugar

simple
  • Prep time:
    15 minutes
  • Cook time:
    10 minutes
  • Total time:
    25 minutes

Ingredients

8 pieces
50 g Palm Sugar
50 ml water
150 g coconut flakes
120 g flour
1 egg
300 ml milk
5 tbsp pandan juice
1 pinch of salt

Utensils

  • whisk

Steps of preparation

  1. To make the pandan juice yourself: wash 5-7 pandan leaves and cut them in 3 cm pieces. Mix them in a mixer with 1-2 tbsp of water. Let the juice run through a sieve covered with a napkin.
  2. For the filling: heat up 50 ml water in a pan and add then the sugar. Once the sugar is melted, add the coconut flakes and cook until the water has evaporated.
  3. For the pancakes: mix flour, egg, milk, a pinch of salt and the pandan juice well with a whisk.
  4. Heat up a pan and put about one soup serving spoon on the bottom covering most of it. Cook 2-3 minutes until it makes small bubbles and the boarders darken up a little. Then flip and cook another minute on the other side.
  5. Repeat and use all of the batter.
  6. Place 1 to 1,5 tbsp of filling in the top part of the pancake. Cover it with the other side. Fold the outer sides and roll it.
  7. Cut the pancakes in half before serving.
  8. You can add whipped coconut cream to go with it.

Notes

If Pandan leaves are not available, add vanilla and green food color.
Instead of palm sugar you may use brown cane sugar.

How do you like the recipe?

  1. 1
  2. 2
  3. 3
  4. 4
  5. 5

You tried this recipe?

Then link @thecookingglobetrotter on Instagram or use the hashtag #thecookingglobetrotter.

More recipes from all over the world

Those lovely Crêpes are delicious also filled with caramelised bananas! Or how about Coconut Flakes and melted chocolate? Add some salted roasted and chopped peanuts for a salty kick!

If you also love pancakes as we do, go have a look at a very traditional Austrian dish: shredded pancakes with apple sauce!

Or if you prefer to take your taste buds to Thailand, check out all my Thai recipes! Made from scratch and still easy and delicious!

Pin Pinterest Thai cooking Pineapple fried rice culinary journey of the cooking Globetrotter Laura Thailand favourite Thai dish fried rice with peas, cashew nuts, carrots, pineapple and turmeric
Save this Thai pineapple fried rice on Pinterest

Original recipes from South East Asia and more

Thanks to my dear friend and culinary sister Jyune for sharing with me this recipe! She is an incredibly talented Chef, that has been living all over the world and is able to whip up a feast in no time (looking fabulous too).

Just one of the treasures I am taking with me from this Singapore journey that is coming to end soon.

I’ll make sure to share more about all I have learned here from my cooking and baking groups (ICCS), not only the local dishes but also middle eastern platters, Indian delicacies, Romanian delights and much more. In the meantime, join my culinary journey on Pinterest!

A traditional Indonesian and Malaysian dessert, rolled crepes, flavoured with pandan juice and stuffed with coconut caramelized in palm sugar
Indonesian Pandan Crêpes with Coconut Filling

*affiliate link: this post contains affiliate links, meaning I recommend products I’ve used and may receive a commission if you purchase them too (at no additional cost to you).

Laura Matteucci

Ciao!

Ich bin Laura, in Italien geboren, jetzt in Österreich zuhause. Zwischendurch habe ich in ChinaSingapur und den USA gelebt.

Wir reisen so oft (und weit) wie möglich. Und wenn wir nicht gerade unterwegs sind, dann kochen wir um die Welt mit saisonalen und regionalen Zutaten.

Hier findest du unsere Lieblings Rezepte aus der ganzen Welt!
Viel Spaß beim Stöbern! 

Deine Laura

Mehr über mich erfährst du hier

It is time to start thinking about Christmas cookies! The first recipe I want to share with you this year is of my very easy Coconut Macaroons.

Gluten-free and a perfect addition to your Christmas plate, those coconut cookies are ridiculously simple to make and taste amazing!

Slightly crunchy on the outside and a bit chewy inside, sprinkle some melted chocolate on top for that extra touch.

Main coconut gluten free cookies Christmas macaroons recipe easy quick delicious
Coconut Macaroons

All you need for those cookies are 5 ingredients and two spoons! Oh, yes, an oven too! The recipe makes about two trays of cookies. Use tablespoons for big cookies or teaspoons if you prefer a petit version.

The coconut macaroons are gluten-free and therefore ideal when you want to treat someone with dietary restrictions.

Ready for the recipe? Here it comes!

Close gluten free Coconut Macaroons gluten free christmas cookies Christmas
Coconut Macaroons


Ingredients:

  • 1 egg
  • 125g sugar
  • a pinch of salt
  • 50g of melted butter (or coconut oil)
  • 300g of coconut flakes
  • melted chocolate to decorate (optional)

Instructions:

  1. Beat the egg until it has incorporated some air and makes bubbles.
  2. Add the sugar (125g) slowly while mixing and a pinch of salt and mix until it’s creamy.
  3. Add the melted butter (50g) and the coconut flakes (300g) and amalgamate. Sometimes the coconut is very dry, if this is the case, you may need to add another egg to amalgamate everything together.
  4. Heat the oven at 170° with ventilation.
  5. Use a teaspoon to measure the dough (the cookies will cook evenly if they have the same size), form a cone with your fingers while the dough is on the spoon and place it on the baking tray lined up with baking paper.
  6. Bake for 10’.
  7. Let them cool down completely.
  8. If you like you can dip the bottom or the top in some melted chocolate, simply drip it over with a spoon or alternatively sprinkle with icing sugar.
  9. Enjoy!

Looking for more Christmas cookies? Got you covered! Simply go to the top menu and click on recipes / by occasions / Christmas.

No time to bake right now? No problem, you can save my recipe for the coconut macaroons on Pinterest!

I will be adding more recipes soon! Subscribe to my newsletter and you will be informed via email when I publish a new recipe!

Pinterest Coconut Macaroons gluten free Christmas cookies
Pin those Coconut Macaroons on Pinterest!

Is it too early to start thinking and baking Christmas Cookies? And how about adding some exotic flavors to the old and traditional selection?

This year our Christmas cookies selection is going international! I am adding to all the well known and traditional Austrian sweets an Indian recipe, that my dear friend Priyanka shared with me: Jeera – Indian cumin cookies.

They are slightly salty and traditionally served with tea (loved them with Chai tea latte). I am sure you will also appreciate how they complement and contrast the sweetness of the traditional Christmas cookies.

Main Jeera Indian Cumin Cookies shortbread
Priyanka’s Jeera

In the picture above you see in the background one of the essentials of the Indian cuisine: the spice box – a round metal tin containing some of the precious spices used in Indian dishes. Mine contains Chili powder, turmeric powder, cumin powder, cumin seeds, nigella seeds, garam masala, and black peppercorns.

The cookies are placed on a traditional copper plate, also used to serve naan (Indian flatbreads, get the recipe here), curries and rice. If you love the Indian flavors as much as I do, you can make your own butter chicken by following my simple recipes.

The background in the picture is a Malay Batik, a cloth dyed with a particular technique, very popular in Southeast Asia. There are many different patterns, each region has its own. It is nicely folded and wrapped around the waist or used to make shirts, dresses and all kinds of things.

Pin Jeera Indian Cumin Shortbread cookies
Save those Jeera on Pinterest

Back to cooking, let me share the recipe for the Jeera (which means cumin and is pronounced “Zeeerah”) with you, it is really simple. Just remember to cool down the dough in the fridge for about 1 hour.

Ingredients:

1-2 teaspoons of cumin seeds
60g of butter, room temperature
40g of icing sugar
80g of flour
1/4 teaspoon of salt

Instructions:

  1. Roast the cumin seeds (1 to 2 tablespoons) in a small pan until dark brown, move them around often. Let them cool down.
  2. In a large bowl whisk well together room temperature butter (60g) and icing sugar (40g) until creamy.
  3. Add the flour (80g), half of the roasted seeds and salt and amalgamate.
  4. If the dough is not soft enough (should be smooth), add a spoon of milk.
  5. Put your cling sheet (kitchen plastic wrap) on the kitchen and pour the dough on it. Shape it like a long log (sausage) and close it tightly. Refrigerate for 30 minutes to 1 hour.
  6. Heat the oven at 170° (ventilation, 190° otherwise).
  7. Take out the cookie dough and cut it in about 1/4 cm slices and place them on your baking tray lined up with baking paper. Leave some space in-between as they will slightly grow.
  8. Sprinkle the top of the cookies with the remaining cumin seeds.
  9. Bake for 12 minutes, or until the edges become darker and the center is still white.
  10. Let them cool down and enjoy with Chai tea!

Are you going to add those Jeera to your Christmas Plate? I’d love to know! Simply comment below!

Print out the recipe below and save it within your collection!

[amd-zlrecipe-recipe:3]

Thank you so much, Priyanka for this recipe! We shared the love for cooking and baking and two groups of the International cooking club Singapore. Priyanka not only took the portrait picture for my blog and taught me those yummy cookies, but she has also become a dear friend with great humor, she always has kind and lovely words and I feel very blessed to have shared my Singapore chapter with her.

Laura & Priyanka
My dear friend Priyanka an I

A slice of Pecan Pie is a wonderful treat! Pecan nuts are crunchy, tasty, nutty and look beautiful too! But a whole pie might be too much, so I decided to make single portions using silicon muffin forms and used less filling as it tends to be too sweet for me.

Now that they are almost bite-size, I can also add them to my Christmas cookies plate.

Don’t they look lovely? Believe me, they taste even better!

Mini Pecan Pies
Mini Pecan Pies

I was inspired by a recipe that I found in one of my favorite cookbooks, as it is a collection of recipes from all over the world, written by many of my culinary sisters (as I love to call them) from International Cooking Club Singapore. The book is called “The red dot melting pot” and can be ordered online (no affiliation, this is a non-profit organization).

I adapted the recipe slightly to my needs and taste, as I always do. This one will make about 30 mini pies, depending on the size of your muffin tins. If you wish to do just 12-15 mini pies, cut the quantities in half.

Do you love the idea of mini portions? Then go ahead and check out also my buttermilk mini cakes here!

Mini Pecan Pies
Mini Pecan Pies

Ingredients for the pie crust:

  • 280g of flour
  • 20g of sugar
  • 4g of salt
  • 175g of cold butter
  • 1 egg
  • cold water

Ingredients for the filling:

  • 2 eggs
  • 100g of sugar
  • a splash of vanilla extract
  • 120g of light corn syrup
  • 70g of melted butter
  • 120-150g of pecan nuts

Instructions:

  1. In a bowl mix together flour (280g), sugar (20g) and salt (4g).
  2. Add the cold butter (175g) cut in small pieces and mix.
  3. Now add the egg and one tablespoon of cold water. You might need to mix by hand now to form the dough, stop as soon as it sticks altogether.
  4. Refrigerate the dough for 30 minutes.
  5. Grease the muffin forms (or any other mold of your choice) with non-stick spray or melted butter.
  6. Preheat the oven at 170° on ventilation mode.
  7. Take a piece of dough and press it in the muffin tin with your fingertips and make a small cup in it.
  8. Blind bake the crust for 5 minutes, in the meantime, prepare the filling as follows:
  9. Whisk well the eggs (2) and sugar (100g) in a bowl.
  10. Add a splash of vanilla extract, the corn syrup (120g), and the melted butter (70g, room temperature) and mix well.
  11. Now use a tablespoon to pour the filling in your half-baked mini pie crusts and top them with pecan nuts (I like to use one or two whole ones and then some broken ones to fill the gaps).
  12. Bake for 15-20 minutes until golden brown.
  13. Let them cool down 5 minutes, remove from the tins (I suggest silicon as it makes this step really easy) and let cool completely on a rack.
  14. Enjoy!
Mini Pecan Pies
Mini Pecan Pies

Since I first saw a picture of a beautifully stapled banana bread, I have been looking for a recipe to try. The thing is, I don’t like my banana bread to be too banana! I mean, I want nuts and other flavours in it as well, I don’t want the banana to be the only thing it tastes like. Yes, I know, that’s me (eyes rolling), I want a banana bread that doesn’t taste too much like bananas!!!

But you know what! I found a recipe and I adapted it with some exotic and in Singapore easily available ingredients and I did not only accomplish my goal but I probably took the most beautiful picture with my brand new camera. Not the most beautiful picture in the world, of course, but of my blog. You see yourself:

Exotic Banana Bread
Exotic Banana Bread

So, what do you think? Did I promise you too much??

Ok, I have a couple of other nice pictures to show you, so let me get started with the recipe, so that I can have some text on this post and not only pictures.. It’s a food blog after all!

Ingredients:

  • 80 g of sugar
  • 45 g of Cambodian palm sugar (or brown sugar)
  • 2 eggs
  • 60 ml of milk
  • a splash of vanilla extract
  • 75 g of coconut oil (or any other oil or melted butter)
  • 130 g of mashed ripe banana + one whole banana for decorating
  • 220 g of flour
  • 1 tsp of baking powder
  • a pinch of cinnamon powder
  • a pinch of salt
  • 30 g of pecan nuts (or walnuts)
Exotic banana bread
Recipe for banana bread

Instructions:

1. Preheat the oven at 180° C.

2. Spray a plumcake baking tin with non-stick spray or simply brush with oil or melted butter.

3. Whisk together the sugars (80g white + 45g palm or brown), eggs (2), milk (60ml), vanilla (one splash) and oil (75g) until well combined.

4. Add the mashed bananas (130g) in and mix well.

5. Now add the dry ingredients: flour (220g), baking powder (3/4tsp), a pinch of cinnamon, a pinch of salt and mix just until combined.

6. Add the chopped or simply crashed pecan nuts (30g) and mix them in with a spatula.

7. Pour the dough in your baking tin.

8. Cut the leftover banana in half and place it on the surface, it is going to caramelize and look stunning!

9. Bake for approximately 40 minutes or until golden brown and dry inside (toothpick test!).

10. Let the tin cool down 10 minutes before removing the bread.

11. Let it cool down completely on a rack before slicing it.

12. Enjoy with almond butter.

This recipe was inspired, once again, by the banana bread recipe of Dean Brettschneider‘s book “Bread*”. Can’t go wrong with his recipes!!

Looking for other cakes? Have a look here

*affiliate link: this post contains affiliate links, meaning I recommend products I’ve used and may receive a commission if you purchase them too (at no additional cost to you).

Whether you are a Halloween fan or not, you must agree, that there are a lot of fun and yummy foods out there for this spooky night! How about bloody vampire cookies?

If you are looking for a quick fix with MINIMAL effort and MAXIMUM wow effect, go on and check out my bloody vampire bites cookies!

I can’t really call it a recipe, it’s more like an assembly line… So easy, you can definitely get your kids to help you out! They will not only love the process but also the results!

Main Halloween cookies Oreo vampire
Vampire bites cookies

Ingredients:

* Cookies (Oreo or similar)
* White chocolate to melt or homemade royal icing (egg whites or lemon and icing sugar)
* Red gel color (use the gels!!!)
* Vampire teeth candies
* Eyes sugar candies

If you are willing to, you can definitely bake your own cookies, but try to make them thick as least as Oreos.

For making the Blood, you have different options: you can use candy red melts, melted white chocolate with red gel colors or you can make your icing sugar and color it.

I recommend you use good quality food gel colors.

Close Vampire bites halloween Oreo cookies
Halloween cookies

Instructions:

1. Melt the chocolate in the microwave. Alternatively, prepare your icing sugar.
2. Mix in 1-2 drops of dark red food gel color.
3. With a spoon or a brush pour it on your cookies, do it messy, you do not want it to be perfect.
4. While it’s still soft, add the vampire teeth candy as if it was biting the cookie and if you want, add on or to eyes.
5. Let them set.
6. Use the leftover icing to decorate a baking sheet or your presentation plate!

Happy Halloween!!

Looking for another great treat? Check out my Witch Fingers Cookies!!

On the tropical island of Singapore, there are no seasons except summer… And still, we do see some signs of autumn: the morning thunderstorms, the Halloween gadgets filling up the stores, and the good apples and pumpkins imported from Europe, Australia, or New Zealand.

And what do you do with good apples? Apple pie!!

The first time I made this recipe, I was sure it was going to turn out into a disaster because there were tons of apples but almost no dough… I was soooo wrong!! The cake turned out to be moist and delicious! And it is one of those cases where you throw everything in the mixing bowl and then in the baking tin and in the oven and it’s done! No effort. Great results! Just my kind of recipe!

Ingredients:

* 270 g of plain flour

* 30 g of grounded almonds

* 125 g of caster sugar

* 100 g of melted butter

* 3 eggs

* 16 g of baking powder

* a pinch of cinnamon

* a pinch of salt

* 4 apples

* icing sugar to decorate, optional

Instructions:

1. Preheat the oven at 200 degrees (180 if you are using a fan).

2. Put the flour (270g), grounded almonds (30g), melted butter (100g), 3 eggs, sugar (125g), baking powder (16g), a pinch of cinnamon, and a pinch of salt in a big bowl (or in your kitchen aid) and mix well together (with the flat beater).

3. Wash and peel the apples and cut them into approximately 1 cm pieces and add them straight away to the dough. If you are quick you do not need to add lemon to prevent them from going black. Mix well with a spatula now, don’t use the machine or it will break the apples. If you want to decorate your pie, keep one of the 4 apples aside for that.

4. Spray the baking tin with non-stick spray (it will be easier to release the cake, but it is not necessary). I like to use a round tin with a hole in the middle, but you can also take the square or round ones.

5. Pour the dough in the tin and spread it out evenly pressing it down a bit.

6. Optional: decorate with the leftover apple if you wish to, for example by cutting small slices and putting them in circles like roses.

7. Bake for 25-30 minutes or until golden brown and the sides detach from the tin.

8. Let it cool down 10-15 minutes before releasing it from the baking tin.

9. Let it cool down further ideally on a rack before sprinkling with icing sugar.

10. Serve with whipped cream for a fancy dessert!

Pumpkin soup with potato

It is time for healthy and delicious soups: here you find the recipe for my creamy pumpkin soup with potatoes – no cream needed!

The black drops on the soup are of those nutty and aromatic pumpkin seeds oil*. It is very popular in Styria, the eastern region of Austria where it is produced. If this is not available to you, simply use a good quality extra virgin olive oil and sunflower seeds.

I make all of my vegetable soups using this same method. You will end up with a creamy soup without even using cream! You can add some if you like, of course.

I will mention some possible variations to the soup, so keep reading if you are looking for inspirations and ideas.

Creamy pumpkin soup
Creamy pumpkin soup

Ingredients:

3 tablespoons of extra virgin olive oil

1 red onion, chopped

1,5 kg of pumpkin of your choice

3 medium size potatoes

1 litre of hot vegetable broth

salt, pepper

pumpkin seeds and pumpkin seeds oil (optional)

pumpkin and potatoes
Roasted pumpkin soup

Instructions:

  1. Clean and cut the pumpkin in cubes. I used a Butternut here, but it works with any kind of pumpkin.
  2. Do the same with the potatoes.
  3. In a big pot heat up 3 tbs of olive oil and fry the chopped onion in it.
  4. Add some water, just to cover the onions and cook them until translucent, adding more water if the first one evaporated.
  5. Now pour in the pumpkin and potatoes and roast them, moving them around, for about 5 minutes.
  6. Cover it all with the hot vegetable broth. Add salt and pepper.
  7. Cook on medium heat until the potatoes and pumpkin are soft.
  8. Turn off the heat and blend the whole thing carefully with a handheld blender.
  9. Serve and top with pumpkin seeds and pumpkin seeds oil.
  10. Enjoy!
Easy pumpkin soup
Healthy and easy pumpkin soup

If you want a spicy soup add some turmeric and grated ginger.

Instead of pumpkin seeds and oil you can use sunflower seeds and olive oil.

You can also top the soup with whole-wheat bread cubes, roasted in some olive oil and sage.

This recipe can be adapted to any kind of vegetables: you can use carrots, peas, potatoes and leak, sweet potatoes or even a combination of them. Just follow the instructions and be creative with your spices.

When I am on a rush and don’t have time to make my own broth, I boil water in the electric kettle and then add some good quality dried vegetable stock.

Pumpkin soup
pumpkin soup – the easy and healthy way

Looking for the perfect bread to go with this yummy soup? Make those effortless and quick pumpkin spinach buns!

pumpkin bread
Pumpkin bread

*affiliate link: dieser Post enthält affiliate links. Wenn ihr über diesen Link kauft, erhalte ich eine kleine Provision, dabei entstehen keine zusätzliche Mehrkosten für euch. Ich gehe mit affiliate links sehr verantwortungsvoll um und empfehle nur Produkte, die ich selber nutzte und liebe. Danke für deine Unterstützung!

Are you already in autumn mood? After three years of tropical summer in Singapore, I am really enjoying the change of season.

We have plenty of fresh and regional pumpkins. And what do you do with pumpkins? Bread, right!? I want to share with you a recipe that is the perfect pairing for a creamy pumpkin soup: pumpkin bread with spinach and feta cheese!

Ok, first things first: I got this recipe from Dean Brettschneider‘s book “Bread”. I had the pleasure to meet him during one of his baking classes and it was amazing to see him in action. He not only has the best bread in Singapore but is also extremely passionate about his work.


Ingredients:

* 500 g of (bread) flour

* 8 g of salt

* 40 g of baking powder

* 65 g of room temperature butter

* 350 ml of milk, room temperature

* 100 g of feta cheese

* 100 g of spinach, chopped

* 100 g of cubed and cooked pumpkin

* a handful of pumpkin seeds (optional)

Instructions:

1. Warm up the oven at 200° C if using a fan and 220° C if using a conventional oven.

2. I used my kitchen aid with the dough attachment to mix the dough, but you can of course also do it by hand.

3. Start by pouring the flour (500g), salt (8g) and baking powder (40g) into your bowl, mix them slightly.

4. Pour in the butter (65g) in chunks and at room temperature and mix shortly.

5. Add a pinch of pepper to it and mix.

6. At slow speed pour in the milk (350ml room temperature) slowly and stop mixing once you’re done the pouring. No overmixing!

7. Now add the chopped spinach (100g, you can use frozen ones but do cook them first as to get rid of all the water and let them come back to room temperature), feta (100g) roughly crumbled with your fingers, and pumpkin (100g, cooked) and gently mix. You may have to use your hands to fold everything in nicely at this point.

8. Divide the dough into 4 equal parts, make a round shape out of each one and place them on a baking tray lined with baking paper.

9. Flatten them down slightly and gently as to make a huge bun, lightly dust with flour and decorate with pumpkin seeds if you like (I forgot, as you can see..).

10. Let them rest, covered, for 15 minutes.

11. Before baking them, cut them with a knife into quarters, but don’t cut through, just go halfway.

12. Bake for 20 minutes, remove from the oven and let them cool down on a wire.

13. Enjoy with your favorite soup!

This is a delicious quick bread, better consumed straight away. If you wish to store it, I recommend you freeze your pumpkin and spinach bread. You can then let it defrost at room temperature and heat it up for 5-10 minutes in the oven once you need it.

If you are looking for another type of delicious and gorgeous bread, go have a look at mine Pull-apart Bread with Walnuts and Pumpkin SeedsPull Apart Bread – it’s perfect for parties and to share. Totally flexible, you can fill it with savory or sweet ingredients.

No time to bake right now, but you don’t want to forget the recipe? You can pin the pictures on your Pinterest Boards to save them for later.

pin
Pin me on Pinterest

This pull-apart bread with walnuts and pumpkin seeds is simply delicious! I made it first as a side for our Christmas Dinner and we just couldn’t stop eating it! It is perfect in summer as well, it goes especially well with a BBQ.

I have the recipe from my dear friend and amazing baker Belma, Ahlanisweethome.com , she has tons of easy and impressive recipes, mostly sweet. I adapted the recipe to make it a savory bread and used locally grown walnuts and pumpkin seeds (from Styria, where I live).

The recipe is totally versatile! You can make it into a savory or sweet bread, simply by changing the filling! Try it out with mozzarella and tomato sauce for a pizza-like bread or with chocolate chips and nuts for a sweet treat!

I had to double the quantities to make this big loaf as I wanted to use my new baking tool, a baking tin with holes to make the bread crunchy and crispy all over, it worked really well and since it was so delicious, it was no problem to finish it!

I also played around with my macro lens to shoot the pictures, I love how it captures the light and details!

Here comes the very simple recipe!

bread with styrian nuts
Pull apart bread

Ingredients:

  • 42 g of fresh yeast (or 21 g of active dry yeast)
  • 130 ml of lukewarm milk
  • 20 g of sugar
  • 500 g plain flour
  • 2 eggs
  • 70 g room temperature butter + 50 g of melted butter for the filling
  • 8 g of salt
  • 30 g of chopped walnuts
  • 30 g of chopped pumpkin seeds
Bread with Styrian nuts
Bread with walnuts and pumpkin seeds

Instructions:

  1. Dissolve the yeast (42g) in the lukewarm milk (130 ml) with a spoon of sugar.
  2. In a big bowl pour the flour (500g), 2 eggs, the remaining sugar, room temperature butter (70g), salt (8g) and the yeast/milk and mix well, until the dough stops sticking to your hands. You may also use a kitchen machine with a hook to knead the dough.
  3. Cover the bowl and let it rise for one hour in a warm place, it should double its volume.
  4. Roll it out on the kitchen counter, dusted with some flour. You want it to be 1/3 cm thin or so.
  5. Brush the melted butter on top of the rolled dough and sprinkle with the chopped walnuts and pumpkin seeds (leave some for the top).
  6. Now take a look at your tin and cut the dough in squares that will fit the smaller side of it. Pile them up in the tin. If it’s too much dough, you can use it to make muffins like in my recipe here. If you have the feeling it’s not enough, space it out a bit, it doesn’t have to be too tight.
  7. Sprinkle the top with the leftover nuts and seeds.
  8. Let it rest, covered, for 30 minutes and preheat the oven to 180 C in the meantime.
  9. Bake for 30-35 minutes. Let it cool down 5 minutes before removing it from the tin. Let it cool down on a rack completely, if you can resist to it!
  10. Enjoy!
bread with walnuts
Styrian bread

This pull a part bread is part of my current theme about summer recipes. We already published granola and strawberries tarts and a delicious and healthy low carb bread made with zucchini, herbs, and ricotta.

Belma's bread
Bread with Styrian nuts
Pull apart bread with nuts and seeds
Bread with pumpkin seeds and walnuts

Did you love the recipe and the pictures? Then share them on Pinterest! Simply hover over the pictures above and pin them on your boards!

I love Granola, so those beautiful fruity and healthy Granola cups have been on my to-bake-list since I first saw them on Mona’s Instagram Account @foodstylist_happykids. When the first local strawberries were available, I knew waht I would do with them!

I changed the recipe to adapt it to our tastes and necessities and it tastes fantastic! Since Skyr and Quark are not widely available in Singapore, I came up with a variation for the mousse, using Mascarpone and greek style yogurt worked just fine.

With this recipe I am participating to the Foodblogliebe Community #erdbeer❤️ (strawberrylove) Event. On Instagram you will find a lot of inspiration under this hashtag. And I am sharing here with you other 11 recipes, that our Blogger community prepared for this event.

I baked the cups in mini muffins silicone forms. I tried with the traditional metal ones, but that did not work out. If you do not have the silicon forms, you can simply use paper cups instead.

Not only you can change the ingredients of the mousse (either Skyr and Quark or Mascarpone and Yoghur), you can also use different fruits and combinations. Here I used strawberry as powder and fresh ones. But I also made them with raspberry powder and fresh strawberries, which also turned out great. Simply try out and let me know what your favourite combination is!

One last thing before I leave you to the recipe. There is something new on the Blog: GERMAN!!! I am in the process of translating everything in German. This here is the first recipe that you can see in both English and German! The rest will follow.

Granola tarts with strawberries

  1. 1
  2. 2
  3. 3
  4. 4
  5. 5

Looking for a healthy and refreshing snack? I got you covered! Make these easy and quick granola tartellettes and top them with a delicious and guilt-free strawberry mousse!

simple
  • Prep time:
    10 minutes
  • Baking time:
    20 minutes
  • Total time:
    30 minutes

Ingredients

16 pieces
100 g Almond meal (or grounded almond)
60 g rice syrup or honey
100 g grounded rolled oats
60 g coconut oil, liquid
50 g Mager Quark or Mascarpone Cheese
100 g Skyr or Greek Style Yoghurt
20 g icing sugar
10 g strawberry powder
strawberries to decorate
quinoa puffs to decorate

Steps of preparation

  1. Ground the oats with a blender.
  2. In a bowl mix well the grounded almonds (100g), oats (100g), coconut oil (60g) and syrup or honey (60g).
  3. Preheat the oven at 160C (fan).
  4. Pour 1-2 tbsp of the mixture in your muffin forms, depending on the size: 1 tbsp for mini muffins, 2 tbsp for regular size. I recommend using silicone tins. Avoid metal ones. If you do not have them, use paper ones.
  5. Press the dough in the tin with your fingers (pour and hold the spoon with one hand and press with the other) as to make the base.
  6. Bake in the oven for 20 minutes.
  7. In the meantime, you can prepare the mousse by mixing the quark and skyr or the mascarpone and Greek-style yoghurt (50g+100g) with the icing sugar (20g) and strawberry powder (10g).
  8. Let your granola cups cool down and then place 1-2 tablespoons mousse on top.
  9. Decorate with fresh strawberry slices and quinoa puffs.
  10. Serve cold and store in the fridge.
  11. Enjoy!

How do you like the recipe?

  1. 1
  2. 2
  3. 3
  4. 4
  5. 5

You tried this recipe?

Then link @thecookingglobetrotter on Instagram or use the hashtag #thecookingglobetrotter.

And now have a look at the fantastic creations of my friends Bloggers:

Enjoy the strawberry season!!

Laura | The cooking Globetrotter

Granola Strawberry Tartes
Pin me!

I never eat dessert when I go to a Thai Restaurant because the mains are so delicious that I simply can not eat anymore!! But now that I know how yummy Thai Mango Sticky Rice is, I’ll definitely have to leave space for it next time!

This isn’t just a tasty dessert but also a great and refreshing snack or light meal on its own! The rice is infused with coconut cream and the freshness and tanginess of the mango offer an incredible balance in the flavors!

Give it a try, it’s really simple!

Main Ingredients for Thai Mango Sticky rice, a simple dessert or snack that you can enjoy at home too. This easy and quick recipe will take you on a culinary journey to Thailand
Ingredients for Thai Mango Sticky Rice

Ingredients for 2:

* 200 g of precooked asian rice (leftovers? great!!)

* 250 ml of coconut cream

* 2 teaspoons of palm sugar (or brown sugar)

* a pinch of salt

* 1 Mango (ideally thai honey one)

* mint leaves to decorate

* sesame seeds to decorate

Instructions:

1. In a small pan combine the coconut cream (250ml), palm sugar (2 tsp) and a pinch of salt and bring to a simmer at low heat. Cook while stirring often, until the sauce has thickened. Then remove from the heat.

2. Warm up your leftover rice in the microwave.

3. Pour half to 2/3 of the prepared coconut cream on the rice and mix well. Cover and let it sit for 10-15 Minutes, the rice will absorb the cream.

4. Peel and slice or cube your mango – not your fingers, please!

5. Place the rice in a nice bowl, top it with the mango (you’ll probably need just half of it), pour some or all of the remaining coconut sauce on top, sprinkle with sesame seeds and decorate with mint leaves.

6.Enjoy!

Thai Mango Sticky rice, a simple dessert or snack that you can enjoy at home too and will take you on a culinary journey to Thailand
Mango Salad and Sticky Rice

I made a small mango raspberry salad on the side and topped it with black and white sesame seeds and mint leaves. A delight!! If you have any coconut sauce left, pour it over the fruit salad and you’ll have another amazing treat!!

Check out all of my Thai Recipes here on the Blog to make an authentic Thai Feast in the comfort of your home!

Index Featured

Pad Thai

Homemade juicy but not greasy Pad Thai with prawns. Find out how to cook it…
Read More
Laura Matteucci

Ciao!

Ich bin Laura, in Italien geboren, jetzt in Österreich zuhause. Zwischendurch habe ich in ChinaSingapur und den USA gelebt.

Wir reisen so oft (und weit) wie möglich. Und wenn wir nicht gerade unterwegs sind, dann kochen wir um die Welt mit saisonalen und regionalen Zutaten.

Hier findest du unsere Lieblings Rezepte aus der ganzen Welt!
Viel Spaß beim Stöbern! 

Deine Laura

Mehr über mich erfährst du hier